# CI/CD实践
#
# CI/CD实践
这里是 构建应用流程 环节当中的一部分,示例代码放在了 ci_demo (opens new window) 当中
# CI/CD
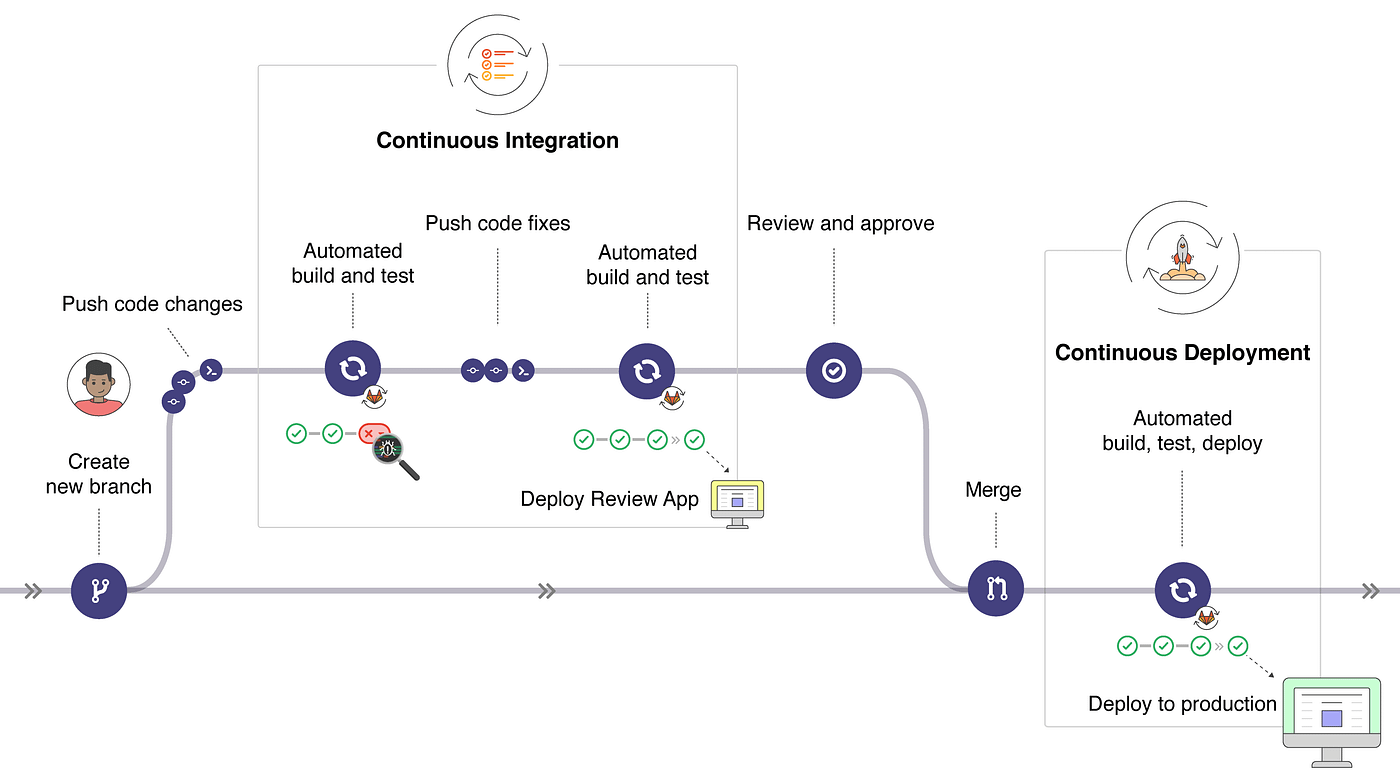
这里的 CI/CD 是总称,代表了持续集成、持续交付和持续部署。可以参考Introduction to CI/CD with GitLab (opens new window)

# 持续集成
持续集成(continuous Integration),简称 CI,是一种软件开始实践,是指每个成员在一天当中会不断的集成到主干分支,并且在提交、合并代码时对项目进行构建、编译和测试,每次集成都通过自动化的构建。测试不通过,不能进行集成。

# 持续交付
持续交付(Continuous Delivery)将集成到主干的软件新版本,手动部署到准生产环境(测试环境)

# 持续部署
持续部署(Continuous Deployment)在持续交付的基础上,部署到生产环境的过程自动化。

# 方案对比
主要在以下方案中进行选择,自己想的原则是:
不冗余服务
能用一个服务搞定的,就不用多个服务。
坑大小
此方案是否足够完善,有足够的文档生态支持踩坑。
# Gitlab CI
在Gitlab 8.0之后就默认集成,并且自动开启。
# Jenkins
市面上比较成熟的方案,可以完整的实现 CI 和 CD
# 其他
- Travis CI
- CircleCI
# 结论
选择 Gitlab 做 CI 部分, Jenkins 做 deploy 的部分, 可以参考 基于GitLab CI搭建Golang自动构建环境 (opens new window),而中间的桥梁可以 git tag 成为 Release 来实现。

# Gitlab-CI 搭建环境
主要参考了Golang基于Gitlab CI/CD部署方案 (opens new window) 以及 基于GitLab CI搭建Golang自动构建环境 (opens new window)一文。
集成的流程包括以下:
- lint 校验
- 单元测试
- 构建
# 基础概念
Markfile 是Linux 的构建工具,具体教程可以参考 阮一峰:Make 命令教程 (opens new window)当中所说的。
用 GitLab CI 进行持续集成 (opens new window) 文章中,对一些概念的梳理:
+------------------+           +----------------+
|                  |  trigger  |                |
|   Commit / MR    +---------->+    Pipeline    |
|                  |           |                |
+------------------+           +----------------+

+--------------------------------------------------------+
|                                                        |
|  Pipeline                                              |
|                                                        |
|  +-----------+     +------------+      +------------+  |
|  |  Stage 1  |---->|   Stage 2  |----->|   Stage 3  |  |
|  +-----------+     +------------+      +------------+  |
|                                                        |
+--------------------------------------------------------+

+------------------------------------------+
|                                          |
|  Stage 1                                 |
|                                          |
|  +---------+  +---------+  +---------+   |
|  |  Job 1  |  |  Job 2  |  |  Job 3  |   |
|  +---------+  +---------+  +---------+   |
|                                          |
+------------------------------------------+
2
3
4
5
6
7
8
9
10
11
12
13
14
15
16
17
18
19
20
21
22
23
24
25
里面有很多变量:GitLab CI/CD Variables 中文文档 (opens new window)
# 安装和运行 Gitlab Runner
具体的常用命令可以参考: GitLab Runner安装注册配置管理 (opens new window)
运行命令时全部使用 sudo 前缀
使用 docker 安装 runner,install runner by docker (opens new window)
自己梳理的流程是:
register(注册) -> run(启动) -> install(服务管理)
以普通用户身份注册的 Gitlab 服务不会在后台运行,此时需要手动执行 gitlab-runner run 命令

如果是超级用户用 sudo gitlab-runner register 注册的服务,会在后台运行,不需要执行上述命令。
2
3
GitLab-CI与GitLab-Runner (opens new window) 里描述了两者之间的关系
https://docs.gitlab.com/runner/install/linux-manually.html
# Replace ${arch} with any of the supported architectures, e.g. amd64, arm, arm64 # A full list of architectures can be found here https://gitlab-runner-downloads.s3.amazonaws.com/latest/index.html curl -LJO "https://gitlab-runner-downloads.s3.amazonaws.com/latest/deb/gitlab-runner_arm64.deb"
# 拉取镜像
这里需要注意平台的问题,是 amd64 还是 arm64
yobasystems-gitlab-runner (opens new window)
ulm0-gitlab-runner (opens new window)
# 启动
docker run -d --name arm-runner \
-v $(pwd)/.runner:/etc/gitlab-runner -v /server:/server \
--restart=always \
klud/gitlab-runner
2
3
4
# 注册
docker exec -it arm-runner /bin/sh
docker exec -it arm-runner gitlab-runner register
# 其他操作
可以细节参考:搭建一个使用 GitLab CI 的项目 (opens new window)
# 停止服务
sudo gitlab-runner stop
# 卸载服务
sudo gitlab-runner uninstall
# 重新安装服务,指定工作目录和用户
sudo gitlab-runner install --working-directory /home/gitlab-runner --user root
# 完整配置
# sudo gitlab-runner install --working-directory /home/gitlab-runner --config /etc/gitlab-runner/config.toml --service gitlab-runner --syslog --user gitlab-runner
# 注册
 sudo gitlab-runner register
# 校验
sudo gitlab-runner verify
# 启动服务
sudo gitlab-runner start
# 查看状态
sudo gitlab-runner status
2
3
4
5
6
7
8
9
10
11
12
13
14
15
16
WARN: 如何遇到没有权限调用 install 时,请调用
kill -TERM 1
# 构建问题
dial tcp: lookup thedockerhost on 183.60.82.98:53: no such hos (opens new window)
如果说没有权限之类的,就添加下面的:
privileged = true
# 安装相关相关依赖
Go
Centos Linux 使用Yum安装Go和配置环境 (opens new window)
yum install golang1golint# 换镜像 # 启用 Go Modules 功能 $env:GO111MODULE="on" # 配置 GOPROXY 环境变量,以下三选一 # 1. 七牛 CDN $env:GOPROXY="https://goproxy.cn,direct" # 2. 阿里云 $env:GOPROXY="https://mirrors.aliyun.com/goproxy/,direct" # 3. 官方 $env:GOPROXY="https://goproxy.io,direct" # 安装 golint go get -u golang.org/x/lint/golint1
2
3
4
5
6
7
8
9
10
11
12
13
14
15
16
17
# 构建 pipeline
# lint
使用 golint,对整个项目进行扫描
# unit_test
使用 go test
# coverage
测试覆盖率
Gitlab CI for Go projects (opens new window)
Golang Multi Package Test Coverage in Gitlab (opens new window)
# 徽章
最后的配置解析
^coverage:\s(\d+(?:\.\d+)?%)
# 结果
最后形成的的结果是:
# build
以及 Bilibili 之前泄露过的open-bilibili-go-common (opens new window),整体思路是采用 Merge Request。
[Pull request vs Merge request](https://stackoverflow.com/questions/22199432/pull-request-vs-merge-request)

[阮一峰:Merge Request 的命令行管理](http://www.ruanyifeng.com/blog/2017/07/pull_request.html)
2
3
而各自的 fork 仓库则使用 tag 和类似 Jenkins的构建工具通过 tag的版本管理进行打包部署。
构建主要参考了 Go 多模块构建方案 对项目进行。
部署可以参考 Jenkins基于gitlab中的Tag进行构建 (opens new window) ,以及 使用Jenkins Git参数实现分支标签动态选择 (opens new window) 来进行构建。
# 其他尝试
如何在pre-commit 运行 lint?
利用git hook规范你的代码与commit message (opens new window)
pre-commit-golang (opens new window)
# 参考
有赞 GO 项目单测、集成、增量覆盖率统计与分析 (opens new window)
gitlab-ci配置详解(二) (opens new window)
持续集成的定义和常用 CI 系统对比 (opens new window)